Cutting Glass is a useful skill to learn. Whether you are making a stunning mosaic piece or cutting glass for functional purposes, it is important to know how to cut and shape the Glass properly. With the right glass cutting tools mentioned in the preceding Blog on the House Of Glass website and a steady hand, you are fully equipped to start on your glass cutting project.
As with most first time projects, it is best to practice on scrap glass. You certainly do not want to mess up the actual Glass sheet, so best to try it elsewhere first. The following are the basic Steps that should get you through most glass-cutting jobs.
 Step1: Preparation and Marking the Glass
- Position yourself to be either sitting or standing. Glass cutting is usually done standing up as you will be using your body force when scoring and not just the wrist.
- Preparing your work surface. Make sure your work surface is levelled, firm, clean and at the right height for you.
- Lay out all your tools on your work surface i.e. glass cutter, oil, pliers, ruler and non-permanent marker. Also make sure you have your safety goggles and gloves for protection.
- Clean the glass, making sure it is dust free. Dust can hinder the cutting process.
- Measure and mark the glass with a marker for cutting.
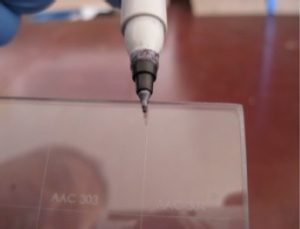
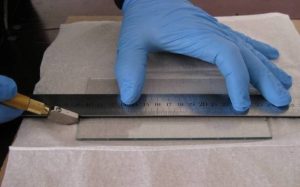 Step 2: Scoring the Glass
- Place your ruler against the marking. You may either press firmly with your fingers or use duct tape to secure the ruler to the glass.
- Lubricate the wheel on the glass cutter lightly with oil. Using the tip of the glass cutter ensure that the cutting wheel is lined up with the markings on the glass.
- Using the ruler as a guide, score the glass with the cutter in one sweeping motion. Cut at a right angle to get a good, even score making sure you have applied enough pressure when cutting. Take Note –
- You should hear the cutter scratch the surface of the glass.
- If no mark is left on the glass, then you are not pressing hard enough.
- If flaking is seen on the score line, then too much pressure is applied.
- Never go over the first score line.
- If needed to cut again, turn the glass over and cut.
- Remove all the markings on the glass by dampening a lint free tissue with ethanol. Carefully wipe off the markings in one smooth wipe.
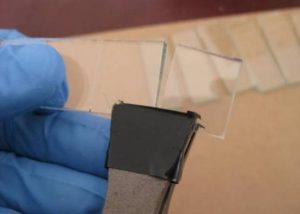 Step 3: Breaking the Glass & Polishing
Now that you have scored the glass, it’s time to break it. You can use either glass cutting pliers or the edge of the table to break the glass along the score line. Break the glass immediately after scoring in a firm and secure grip. Do not wait too long after scoring as the glass tends to “heal”, making it difficult to get a clean break.
Finally, smooth out the edges with a wet emery cloth or fine sandpaper. This reduces the chances of getting cuts and prevents the glass edge from being chipped.
Last but not least, be careful when disposing glass. Wrap up the small slivers and chips in newspaper and tape it together before throwing it out. This ensures a quick tidy up and also avoids accidental cuts. So, go ahead and enjoy your first Glass Cutting project!